APPS
Testimonial Manager
 Visit the Testimonial Manager by selecting it in the app menu or by visiting the Dashboard and selecting it there.
HOME PAGE
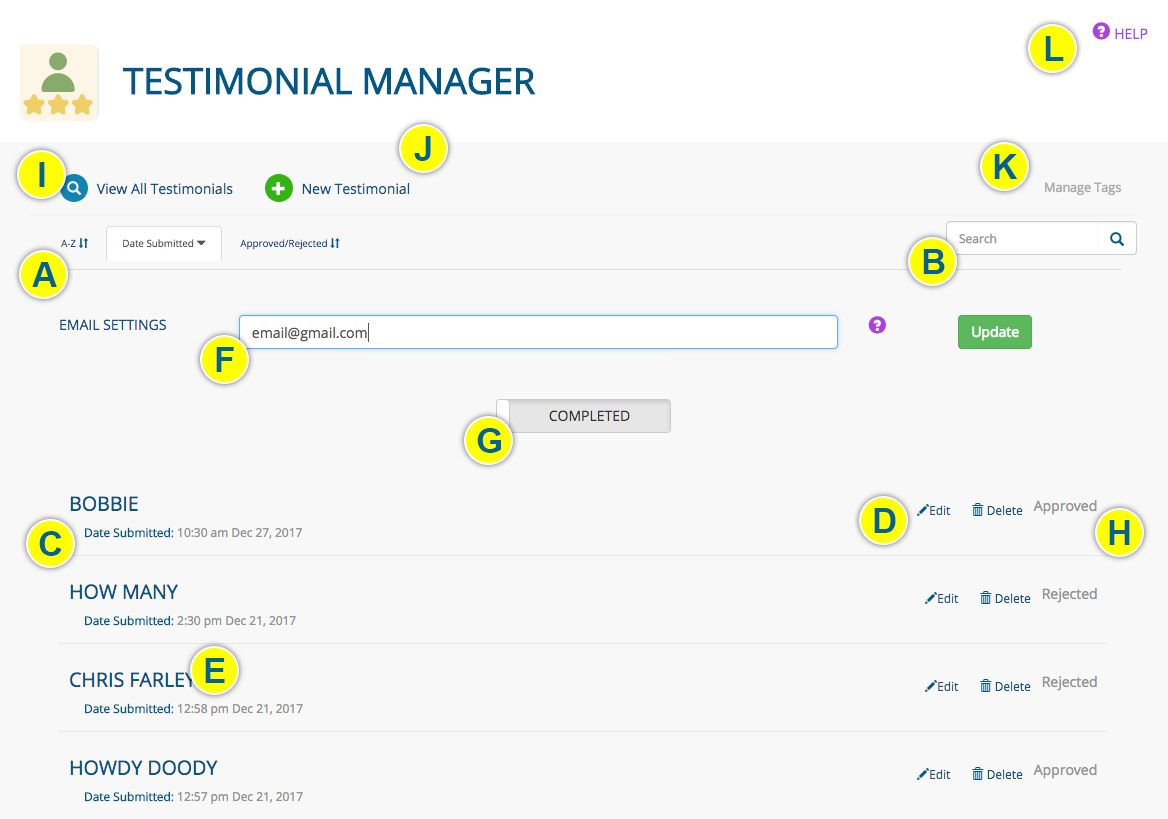
- The Testimonial Manager home page contains a list of all of your testimonials, which you can sort (A) and search (B)
- Each listing (C) tells you when the testimonial was submitted
- Edit or delete a testimonial with the icons (D) at the far right. You also can edit a testimonial by clicking its title (E).
- Enter the email address(es) (F) of the people you would like to receive notifications of testimonial submissions
- Click the toggle (G) to switch between PENDING and COMPLETED testimonials. With the toggle in the completed position, view whether a testimonial has been APPROVED or REJECTED (H).
- Return to this page by clicking VIEW ALL TESTIMONIALS (I) from any page within the app
- Get started on a NEW TESTIMONIAL (J)
- Create, edit and delete tags (K)
- Read documentation on the Testimonial Manager app (L)

SETUP
- During the Buildout stage of your website development, pages from which you would like to collect testimonials will include the appropriate form (or a link to one) to do so. A form easily can be added to an existing page as well; contact us to do so.
NOTIFICATIONS
- When a website user submits a testimonial, an email notification will be sent. To set the email address(es) where the notification will be sent, go to the Testimonial Manager home page and enter it here then click the UPDATE button:

APPROVING TESTIMONIALS
- When a website user submits a testimonial, an entry will be created on the Testimonial Manager home page:

- Select a testimonial to view and edit it. Then your options are to:
- APPROVE, which will make the testimonial ready for publication (you can make edits to the testimonial before approving it). HOW TO ADD A TESTIMONIAL TO A PAGE
- DENY, which indicates you do not want to publish this testimonial (you can publish the testimonial at a later date; read the next section to learn how)
- SAVE, which will save changes you make to the testimonial but not make it ready for publication
- DELETE the testimonial
- You also have the ability to create and apply tags to a testimonial.
- Click a tag in the AVAILABLE TAGS field to assign it to the post. Click a tag in the APPLIED TAGS field to unassign it.
- In the FILTER TAGS, OR ADD NEW field, start typing to filter tags in the AVAILABLE TAGS FIELD. Type a tag title then click the + icon to add a new tag. ABOUT TAGS
COMPLETED TESTIMONIALS
- Testimonials that have been approved or denied are moved to the COMPLETED section of the Testimonial Manager home page. Access this section by toggling the slider from PENDING REQUESTS to COMPLETED:

- Select an approved testimonial to make edits to it or delete it. (Edits will update any instances of the testimonial that have been published on your website)
- Select a denied testimonial to edit, delete or approve it.
CREATING A NEW TESTIMONIAL
- To create a testimonial you have received from a source other than your website, click NEW TESTIMONIAL from any page within the Testimonial Manager

- Enter the name and content for the testimonial, and, if applicable, assign tags to it. Then you can:
- APPROVE, which will make the testimonial ready for publication. ADDING TESTIMONIALS TO A PAGE
- SAVE, which will save changes you make to the testimonial but not make it ready for publication
- You also have the ability to create and apply tags to a testimonial.
- Click a tag in the AVAILABLE TAGS field to assign it to the post. Click a tag in the APPLIED TAGS field to unassign it.
- In the FILTER TAGS, OR ADD NEW field, start typing to filter tags in the AVAILABLE TAGS FIELD. Type a tag title then click the + icon to add a new tag. ABOUT TAGS
NAVIGATING AMONG TESTIMONIALS
- Every testimonial page contains a dropdown menu for easy access to other testimonials

CREATING/DELETING TAGS
- Click the MANAGE TAGS button from any page in the Testimonial Manager app

- In the FILTER TAGS, OR ADD NEW field, start typing to filter tags. Type a tag title then click the + icon to add a new tag.
- Click a red 'x' to delete a tag ABOUT TAGS
ADDING TESTIMONIALS TO A PAGE
- Click the module icon from a content block (if the content block doesn’t have a module icon, CONTACT US)
- Choose TESTIMONIALS from the CONTENT TYPE dropdown menu
- Select the NUMBER OF ITEMS (testimonials) you want to publish
- Click the SHOW ALL ITEMS checkbox to disregard tags
- Click a tag in the AVAILABLE TAGS field to assign it; it will move to the APPLIED TAGS field. Click a tag in the APPLIED TAGS field to unassign it. (LEARN MORE about tags.)
- Click the SAVE button (click the CANCEL button to return to the page you are working on without making any changes)
- The content block will contain your testimonial(s)
Was this page helpful? Leave your comments below.
comments powered by Disqus